
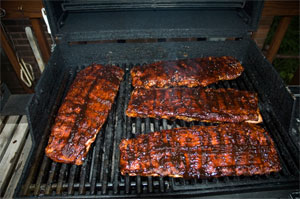
Here's how to make low and slow smoke roasted "Last Meal Ribs" on just about any covered grill and make slabs that taste better than they do in restaurants. This article is an edited version of one that appeared last year in HuffPost before there was a food section.
There's nothing revolutionary in this method. Envision a proto-human tribe padding warily through the fragrant ashes of a forest fire as they follow a particularly seductive scent. When they stumble upon the charred carcass of a wild boar they squat and poke their fingers into its side. They sniff their hands, then lick their greasy digits. 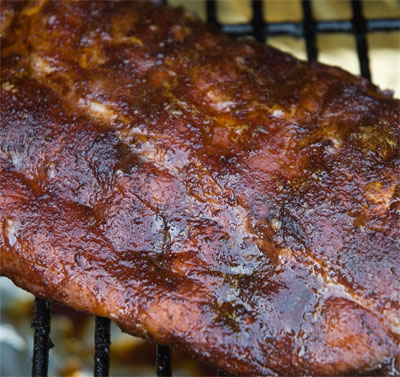
The magical blend of warm protein, molten fat, and unctuous collagen in the roasted meat is a narcotic elixir and it addicts them on first bite. They become focused, obsessed with tugging out the rib bones and scraping them clean between their teeth, moaning and shaking their heads. The aromas make their nostrils smile and the flavors cause their mouths to weep. They sing praises to their gods.
There may be a few more steps in this process than you like, but it's not hard and we're talking blue ribbon competition grade meat here. If you love ribs, follow these steps and you will thank me as so many others have.
Serves. 2 adults.
The ribs that win championships are a melange of flavors: Spice rub, hardwood smoke, tangy sweet sauce, all underpinned by the distinct flavor of pork. They are juicy and tender and they tug cleanly off the bone. Click here for my complete definition of Amazing Ribs, what I look for when I judge competitions.
If you boil ribs the terrorists win
Cooking time. We will be cooking low and slow at about 225F, so allow 5 to 6 hours for St. Louis Cut ribs (my faves) and 3 to 4 hours for baby back ribs.
A lot of folks like to boil ribs. They think it makes the meat tender. The concept comes from Eastern Europe where Poles and Czechs prepare ribs by simmering them in water with cabbage, potatoes, carrots, and caraway seed making a very nice stew.
When you boil meat and bones, you make soup. That's because water is a solvent, it pulls much of the flavor out of the meat, and it can make the meat mushy. Boil them too much and water can even dry them out by causing the proteins to contract and squeeze the moisture out of the muscle fibers. You wouldn't boil a steak would you?
Ribs are best when roasted slowly at low temps in the presence of smoke and humidity. If you are in a hurry, you are better off steaming or microwaving ribs and then finishing them on the grill or under the broiler. Just don't boil 'em!
Serve with
Hardware
1 grill with a cover. You can use a dedicated smoker or any charcoal grill or gas grill as long as it has a cover. A tight fitting cover with adjustable vents like those on the Weber Kettle is best.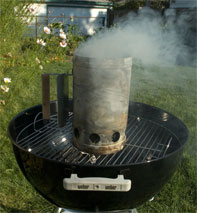
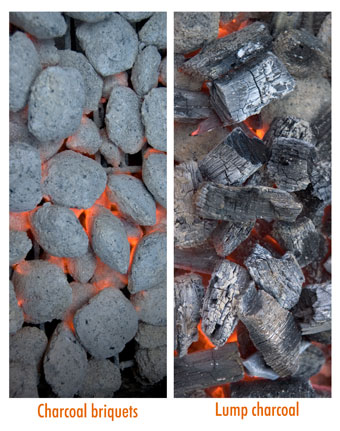
1 (18 pound) bag of charcoal for charcoal grills or smokers. You won't use all that charcoal, but because you will need more on cold, windy, or wet days than on sunny and warm days, have a full bag on hand. Hardwood lump is best, but regular briquets will do fine. Absolutely do not use the instant igniting stuff that has solvent in it. Chimney starters are by far the best way to start charcoal, especially for long slow cooking where the smell of the solvent in charcoal starter fluid can ruin the taste of the meat.
1 tank of propane for gas cookers. You won't need it all, but, until you get the hang of this technique, don't risk running out by starting with a partial tank.
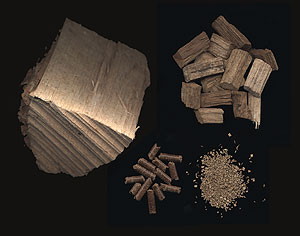
8 ounces by weight of hardwood chunks, chips, or pellets. It doesn't matter how many slabs you are cooking, 8 ounces should be enough. I prefer chunks of apple, oak, or hickory for pork. Never use any kind of pine unless you want meat that tastes like turpentine. Never use construction lumber because it is often treated with poisonous chemicals to discourage rot and termites. You do not need to soak the wood. Wood does not absorb much water. That's why they make boats with it.
1 pair of long handled tongs
1 sauce brush, preferably one of those newfangled silicon brushes
12 feet of heavy duty aluminum foil, not the lightweight stuff
1 good digital thermometer
1 six pack of beer (for the cook, not the meat)
Software
 1 slab of fresh St. Louis Cut (SLC) ribs. That's 1/2 slab per adult. If you use baby back ribs, get a whole slab per adult. You probably will have have leftovers, but what's wrong with that? SLCs are the meatiest and most flavorful ribs. They are spare ribs with the tips removed so they form a nice rectangular rack. You can use baby back ribs if you prefer. They are smaller and cook faster. Country ribs come from the shoulder and are not really ribs, so don't use them for this recipe. Get fresh, not frozen meat if possible. Fresh meat has the best pork flavor and the most moisture. Ever notice the pink liquid when you defrost meat? You can't get that back into the meat, so buy fresh meat whenever possible. Ask the butcher to remove the membrane on the back side.
3 tablespoons vegetable oil
4 tablespoons of Meathead's Memphis Dust or a similar spice rub
1 cup of your signature homemade barbecue sauce or a good commercial barbecue sauce
Do this
1) Rinse. Rinse the ribs in cool water to remove any bone bits from the butchering and any bacterial film that grew in the package (don't worry, cooking will sterilize the meat). Pat dry with paper towels.
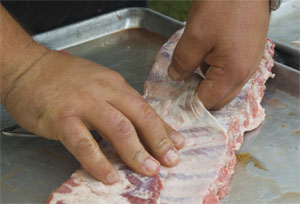 2) Skin 'n' trim. If the butcher has not removed the membrane from the back side, do it yourself. Insert a butter knife under the membrane, then your fingers (shown at right), work a section loose, grip it with a paper towel, and peel it off. Finally, trim the excess fat from both sides. Click here to see more photos of how to skin 'n' trim.
3) Rub. Coat the meat with a thin layer of cooking oil. Sprinkle enough Meathead's Memphis Dust to coat all surfaces but not so much that the meat doesn't show through. That is about 2 tablespoons per side depending on the size of the slab. Many of the herbs and spices in the rub are oil soluble, so the cooking oil will help them penetrate a little better. Spread the Memphis Dust on the meat and rub it in. Wash your hands. Wrap the meat in half the foil and let it sit in the fridge for at least 4 hours on a platter or pan to catch leaks. In addition to flavoring the meat, the salt in the rub pulls the juices to the surface and that will help form a crust during the cooking. If you don't have time to let the meat marinate in the dry rub, it's not the end of the world. Put on the oil and rub anyway and start cooking.
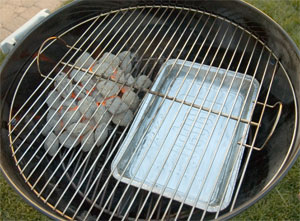 4) Setup for indirect 2-zone cooking. That means that one side is hot and the other is not. If you have a gas grill, use only one burner as described in my article setup for a gas grill. Put a disposable aluminum pan with water on top of the hot burner. Moisture and combustion gasses in a propane grill combine to create a seductive, baconlike flavor in the meat. If it has only one burner, put the water pan between the meat and the burner. If you have a charcoal grill, push the coals to one side as in the photo at right and as described in best setup for a charcoal grill. You can use a water pan, but it is not necessary. If you have an offset firebox smoker, follow my instructions for an setting up an offset smoker. If you have a bullet smoker like the Weber Smokey Mountain, read my article bullet smoker setup.
5) Adjust the temp. Preheat your cooker to about 225F and try to keep it there throughout the cook. Adjust the air intake dampers at the bottom to control heat on charcoal grills. Intake dampers are more effective than exhaust dampers for controlling the temp because they reduce the supply of oxygen to the coals. Take your time getting the temp right. Cooking at 225F will allow the meat to roast low and slow, liquefying the collagen in connective tissues and melting fats without getting the proteins knotted in a bunch. It's a magic temp that creates silky texture, adds moisture, and keeps the meat tender. If you can't hit 225F, get as close as you can. Don't go under 200F and try not to go over 250F. Click here for more about meat science and the thermodynamics of cooking.
 6) Smoke. For charcoal or gas cookers, add 4 ounces of wood at this time. Put the wood right on top of the flame of a gas grill or on the hot coals.
Resist the temptation to add more wood. Nothing will ruin a meal faster and waste money better than oversmoked meat. You can always add more the next time you cook, but you cannot take it away if you oversmoke.
7) Relax. Put the slabs in the cooker on the cooler side of the grill, meaty side up. Close the lid and go drink a beer and read a book.
8) More smoke. When the smoke disappears after 20-30 minutes, add another 2 ounces of wood. After the first hour, stop adding wood. Adding wood at the beginning of the cook allows better penetration before the meat surface seals itself. If you have more than one slab on, halfway through the cook you will need to move the ribs closest to the fire away from the heat, and the slabs far from the flame in closer. Leave the meat side up. There is no need to flip the slabs. Otherwise, keep your lid on. Opening the lid just upsets the delicate balance of heat, moisture, and oxygen inside your cooker. It can also significantly lengthen the cooking time. No peeking. If you're lookin', you ain't cookin'.
9) The Texas Crutch. This step is optional. It involves wrapping the ribs in foil with a little liquid for up to an hour to speed cooking and tenderize a bit, but not a lot. Almost all competition cooks use the crutch to get an edge. If you want to skip this step, feel free, you'll still have killer ribs. Click here to learn more about The Texas Crutch.
10) The bounce test. After allow 5 to 6 hours for St. Louis Cut ribs or 3 to 4 hours for baby back ribs. The exact time will depend on how thick the slabs are and how steady you have kept the temp. If you use rib holders so they are crammed close to each other, add another hour. Check to see if they are ready. I like the bounce test. Pick up the slab with tongs and bounce them. If the surface cracks and it bends a lot, it is ready.
 11) Sauce. Now paint both sides with your favorite homemade barbecue sauce or storebought sauce and put it back in to bake the sauce on. Better still, move the slab directly over the hottest part of the grill in order to caramelize and crisp the sauce. On a charcoal grill, just move the slab over the coals. On a gas grill, remove the water pan and crank up all the burners. On a water smoker, remove the water pan and move the meat close to the coals. On an offset smoker, put a grate over the coals in the firebox and put the meat there. With the lid open so you don't roast the meat from above, sizzle the sauce on one side and then the other. One coat of a thick sauce should be enough, but if you need two, go ahead, but no more! Don't hide all the fabulous flavors under too much sauce. If you think you'll want more sauce, put some in a bowl on the table.
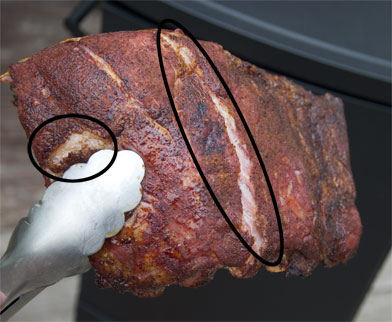
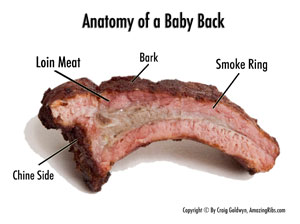 If you've done all this right, you will notice that there is a thin pink layer beneath the surface of the meat. This does not mean it is undercooked! It is the highly prized smoke ring caused by the combustion gases and the smoke. It is a sign of Amazing Ribs. Now be ready to take a bow when the applause swells from the audience.
Tell me
--------------------------------
All text and photos are Copyright (c) 2010 By Meathead, and all rights are reserved. For more of Meathead's writing, photos, and recipes, please visit his website AmazingRibs.com, friend him on Facebook, or follow him on Twitter.