In our new series, Salon vs. DIY, we are challenging the belief that pricey salon treatments are better than what we can do ourselves in our own bathrooms.
I have, in theory, the perfect hair for a blowout. It's long, naturally shiny and extremely manageable, plus my recent ombré dye job looks better with curls. The only problem: I'm terrible at doing hair. I don't own a blow dryer and I can never make curls look even with a curling iron. Would a professional blowout be the way to go? For $40, I tested it out.
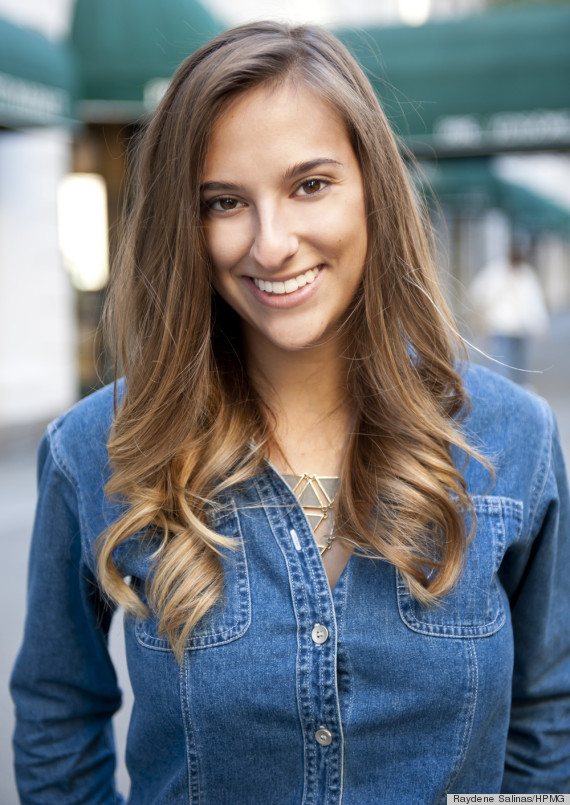
The Salon Experience
I tried out DreamDry, a newcomer on the New York blowout bar scene (and a business venture of Rachel Zoe). Like a normal hair salon, I got my hair professionally washed before the blowout, one of the most heavenly experiences ever, and took a seat in a salon chair.
Then the products started. The stylist towel-dried my hair and used Oribe Volumista Mist for Volume on my roots, telling me it works well with the blow dryer heat. Then she added Oribe Maximista Thickening Spray on the ends. The blow dryer, I was informed, was the fancy new Nanoe Hair Dryer by Panasonic (which retails in the $175 range).
The stylist blew out my hair into curls with a round brush, then curled each one with a hair straightener (but you can also use a curling iron, she informed me) and then pinned each curl up loosely while working on the other ones. At the end, she removed the curls and spritzed me with Oribe Thick-Dry Finishing Spray. It took about 40 minutes in total, and I was left with smooth, bouncy yet understated curls. Success.
The DIY Experience
I approached my own blowout with a heavy dose of skepticism. I didn't even own a blowdryer before this experiment, and my curling iron game is pretty weak. Plus I didn't have a round brush nor the fancy Oribe products. I did, however, obtain a high-quality Centrix Q-Zone Lightweight Dryer. I started by spraying Garnier Curl Shaping Spray Gel on my wet hair, then blowing it out. It looked kind of frizzy and full of fly-aways.
Then I separated the hair horizontally and started curling the bottom layer, spraying each curl with Garnier Flexible Control Anti-Humidity Hairspray as I went along (because I wanted the curls to stay; otherwise they'd fall out). After finishing the bottom layer, I let the rest of my hair down... where it quickly became entangled with the existing curls, making it difficult to pull out the straight hair to curl.
After 40 minutes, I finished and sprayed my entire head with a healthy dose of Garnier Flexible Control Anti-Humidity Hairspray. It was a little bit messy, a little pouffy and full of fly-away hairs. But it was super bouncy!
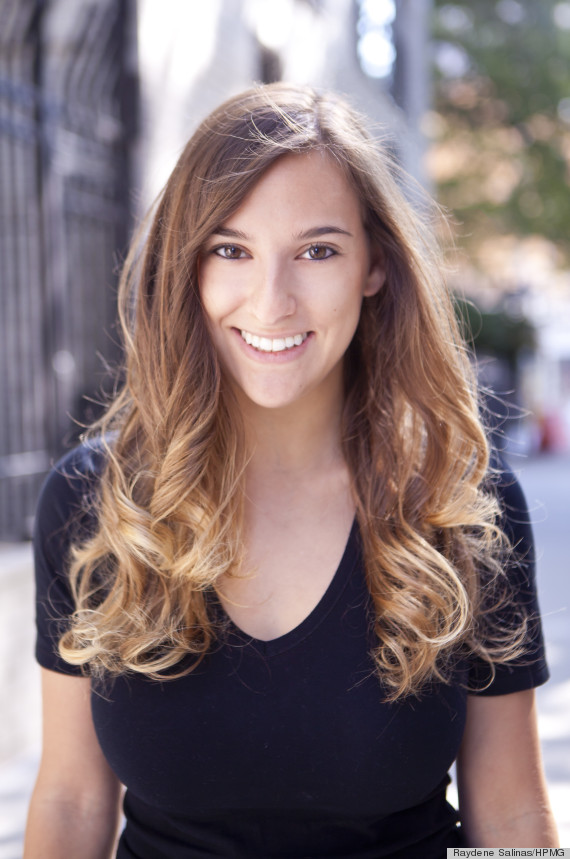
The verdict: Pay for it. Doing it yourself will take too long and come out uneven (or worse, tangled), plus you won't have all the fancy, expensive products of a "dry bar" sitting in your bathroom. Mine was definitely bouncy, but not slick and glossy like the pro job. This one's worth the splurge.
If only it had looked like this at the end...
