One Christmas, I was living in Paris. I had been working as a chef, and graduated from Culinary school in San Francisco, but decided to take additional pastry classes at the Ritz Escoffier (any excuse to get out of town for awhile). In the basement of this stunning old hotel were sparkling white, highly polished kitchens. I kept telling myself I was working on my master's in Chocolate.
My instructor/chef, Jacques, and I fell in love (Jacques is like Bob in the states). He spoke little English and I spoke even less French. His hot, buttery croissants stuffed with dark chocolate said it all. If only I hadn't been kind off engaged to another.
Unlike working the hot line, a bakery is very precise and as December 25th arrived, I was homesick and realizing that I would have to leave soon.
Jacques was trying to make me stay. Pulling out all the stops, he made me a Buche de Noel. He showed no mercy. It was perfection.
I did leave Paris, but not until the entire Yule Log was eaten. I might be silly, but never stupid.
Recently, our client, Viking Cruises, asked us to develop a Buche De Noel recipe for their passengers. The recipe below is foolproof and delicious. Yes it takes a little time, but it can also be used as the centerpiece of your holiday dinner.
After all, we are making memories here, people.
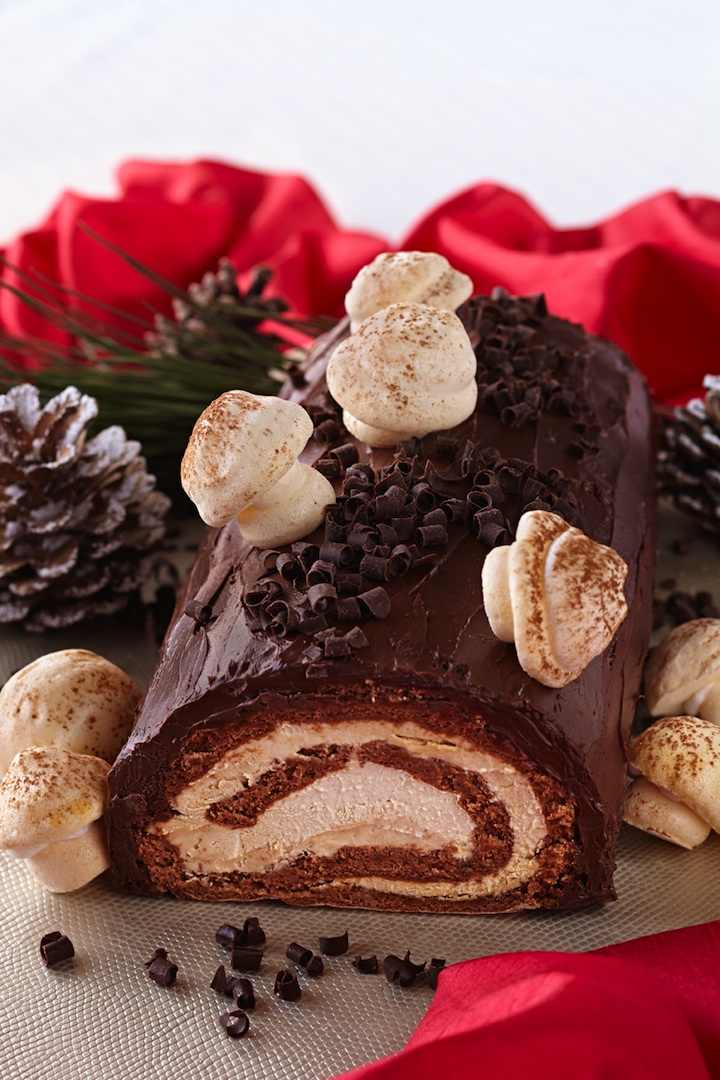
Display your triumph, on a silver tray along with pine cones, pine sprigs and a red ribbon. And kiss the closest Jacques or Bob around.
Buche de Noel
(photo by Jon Edwards)
Makes 12 servings
Cake ingredients:
Unsalted butter for greasing
5 eggs, separated
1 cup sugar, divided
1/2 cup cake flour
1/4 cup baking cocoa
1/4 teaspoon salt
1/2 teaspoon cream of tartar
Filling ingredients:
2 cups heavy whipping cream
1 cup confectioners' sugar
2 teaspoons instant coffee granules
Frosting ingredients:
1/2 cup unsalted butter, softened
1/2 cup baking cocoa
2 1/2 cups confectioners' sugar
2 teaspoons vanilla extract
2 1/2 tablespoons milk
Meringue mushrooms for garnish
Chocolate shavings or curls for garnish, optional
Powdered sugar for garnish, optional
Cake directions:
Preheat oven to 350 degrees F. Line a jellyroll or a 15-in. x 10-in. x 1-inch baking pan with greased parchment paper.
Lay a clean kitchen towel flat on a work surface. Dust with powdered sugar and set aside.
Place egg whites in a small bowl and set aside.
Place egg yolks in a large bowl and beat with an electric mixer until fluffy and lighter in color, about 3 minutes. Gradually add half the sugar and beat until thick and even lighter in color, about 5 minutes. Gradually add flour, cocoa and salt, beating until well blended. Set aside.
Beat egg whites on medium speed until foamy. Add cream of tartar and beat until soft peaks form. Gradually sprinkle in remaining sugar, a tablespoon at a time, beating on high until stiff peaks form.
Transfer a quarter of the egg white mixture into yolks, stirring just to combine. Gently fold in remaining egg whites until no light streaks remain.
Spread batter evenly in prepared pan. Bake for about 12 minutes or until cake springs back when lightly pressed in the center (do not over bake or cake will crack when you roll it).
Remove from heat and let cool on a rack for 3 minutes.
Run a small knife along all four sides to loosen. Invert onto prepared kitchen towel. Peel off parchment paper and loosely roll cake up in towel, beginning with a short side. Set aside to cool.
Filling directions:
Place cream in a large bowl and beat with an electric mixer until it begins to thicken. Add sugar and coffee granulates and continue beating until stiff peaks form. Cover and chill until ready to use.
Frosting directions:
Place all frosting ingredients a large bowl and beat with an electric mixer until smooth. Cover until ready to use.
Assembly directions:
When cake is completely cool, carefully unroll and spread inside with filling to within ½-inch of edges. Re-roll.
Spread outside of cake with a thin layer of frosting. Freeze until frosting is very firm to the touch.
NOTE: At this point, cake can be wrapped in plastic wrap and frozen for up to 2 weeks. Remaining frosting can be frozen in an airtight container for up to 2 weeks. Let frosting come to room temperature then beat with an electric mixer until smooth.
Spread cake with remaining frosting.
Using a serrated knife, cut a thin slice off either end of cake so show the beautiful layers inside.
Use a fork to make shallow squiggly lines down length of the cake.
Scatter chocolate shavings over cake.
Place on serving platter and chill until ready to serve.
Just before serving, decorate with meringue mushrooms. Sift a little powdered sugar over the top if desired.
Meringue Mushrooms
Makes 15-20
These mushrooms can be made up to 2 weeks in advance if stored in an airtight container. The more you make the easier it gets to create these lovely little treats. Wait for a dry day to make these as humidity can cause the meringue to soften and weep.
Ingredients:
2 large egg whites, at room temperature
1/4 teaspoon cream of tartar
1/2 cup baker's sugar (superfine)
1 teaspoon cocoa powder
Directions:
Preheat oven to 200 degrees F. Line a baking sheet with parchment paper. Fit a pastry bag with a large plain round pastry tip. Set aside.
Place egg whites in a medium bowl and beat with an electric mixer at medium speed until foamy. Add cream of tartar and continue beating until soft peaks form.
Gradually beat in sugar. Increase speed to high and beat until mixture is very stiff and glossy.
Place mixture in prepared piping bag.
To make mushroom caps, pipe half of the mixture onto prepared baking sheet into flattened balls between ½- and 1½-inches across. A variety of sizes looks best. Run a dampened finger across the tops to smooth.
To make mushroom stems, pipe meringue into a cone shape, with the bottom wider than the top. Make stems between 1 and 2 inches high, some a bit more, some a bit less. Reserve any leftover meringue.
Bake for about 1 hour or until very firm to the touch.
Remove from heat.
Carefully remove caps from parchment paper. Using a small knife, puncture the bottom of each mushroom cap.
Dab a bit of leftover meringue inside cap (this will work as a glue). Press the small end of stems into caps. Return to baking sheet and bake for 20 minutes.
Dust tops of mushrooms with cocoa powder and store in an airtight container in a cool place for up to 2 weeks.
Denise Vivaldo is the author of 8 cookbooks. She has never been out of the country for Christmas since Paris, and that was two husbands ago.