

The first thing to do is close your eyes and say "I am smarter than my grill. I will not let it ruin meals and make me look like a fool or make my family sick." - Meathead
Remember, when you close the hood, your grill or smoker is just an oven. The main difference between an outdoor oven and an indoor oven is that most grills do not have thermostat control, they are not well insulated, and their cooking temps are influenced by sun, wind, rain, and at my house, snow. The other big difference is that everything tastes better on the grill. In order to take advantage of the great flavor the grill imparts, you need to control the temp, and you need to know what the temp is at the cooking surface all times. Just like indoors.
The first step to becoming a great outdoor cook is to master your instrument, and the best way to do this is to calibrate it with dry runs. No food needed.
The goal is to give you a feel for how your cooker responds to you, but most importantly, how to hit target temps in recipes. Foods, especially meats, are complex chemical concoctions, and their chemistry changes with temp. Read my article on meat science for more on the subject. Because the 2-Zone or Indirect setup is a technique the best outdoor cooks use to cook most everything (it prevents burning, provides a safe zone, produces even temps in the center of thick cuts), it is very important that you click the link above and read my article on the subject, and conduct all tests by setting up for 2-zone cooking.
Seasoning a new grill or smoker
When you get a new grill or smoker, there is often dust, grease, or oil from the manufacturing and shipping process inside where the food goes. Some models were painted and packed in the same day and the paint was not baked on leaving pores in the paint. Not good.
The goal of seasoning a new grill is to remove all traces of contaminants, seal the pores, and bake on paint.
Begin by wiping down all surfaces with soap and water and rinse thoroughly. Then fire it up and get it as hot as you can for about 30 minutes with all the vents open so anything left from the factory or shipping will burn off.
While it is hot, take out the cooking grates, water pan, and other parts and set them aside to cool. Then spray a little vegetable oil on everything inside the cooking chamber and burn up to eight ounces of wood. This will start coating the sides with carbon and smoke which will help prevent condensation when you are cooking. Kinda like seasoning an old cast iron pan. And makes your cooker look kewl and smell sexy.
You can then start cooking while the oven is hot, or let it cool and cook later.
How to place a probe
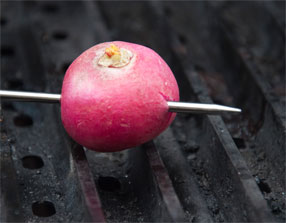
Place your digital thermometer probe 1 to 2" above the cooking surface but don't let the tip touch the metal of the grate which is hotter than the air surrounding it. Some thermometers, like the Maverick, come with a handy clip that does the job just fine. If you don't have a clip, use a small potato, a radish, or a wine cork. Make sure the tip, where the sensitive parts are, protrudes from the veggie. Don't use a wine cork in very hot parts of the grill, it can catch on fire and damage your probe.
These are common targets in my recipes. At 225°F you are cooking low and slow, at a temperature that muscle fibers don't seize up and squeeze out all the juices, perfect for tough cuts of meat like ribs and pork shoulder. Although water boils at 212°F, the water in meat is mixed with proteins and other compounds, so at 225°F on the surface, the water is not hot enough to generate steam.
At 325°F you are cooking hot enough for the Maillard effect to brown the surface proteins, caramelize sugars, render fats, and crisp skins. It usually kicks in at about 310°F. This is the temp I recommend for most turkey and chicken skins. You want to know what the top end is because you will want that for searing the surface of steaks, and for grilling pizza.
The basic concept is to fire up your cooker, make adjustments that will change the temp one variable at a time, and take notes with a cooking log. Click the link to download the one I use. Don't forget to make note of the ambient weather conditions. Your grill will run hotter on sunny days than breezy days or rainy days.
You are doing experimental research here so it is important to apply a vital rule in the scientific method: Change only one variable at a time. Do everything exactly the same from experiment to experiment, change only one thing, and you will learn something factual.
You absolutely positively need a good oven thermometer to calibrate and for when you cook. It is foolhardy machismo to think you can guesstimate the temp by holding your hand over the grill. Everybody's sensitivity to heat is different, and because heat dissipates rapidly as you move away from the source, just moving your hand up or down a few inches can make a major difference.
The thermometer probe needs to be at the grate level where the food is, not in the lid. There can be a big temp diff. Get a digital. It is far more accurate than a dial thermometer which can be off by as much as 50°F. Please read my Buying Guide to Thermometers.
Dry runs for gas grills
 2) Now check for hotspots. Buy some tubes of those ready-made biscuits like Pillsbury Biscuits (click the link, there usually are coupons there). Turn all burners to medium, close the lid, and let the temp stabilize. After about 15 minutes place the biscuits on the grill in a grid, with about 1 or 2" between them. Cover the whole cooking surface. Move quickly or have someone help you. Close the lid and don't open it unless you smell burning. After about 10 minutes, open the lid and quickly flip them. Take a picture after you flip. You will see that your grill has some hotspots. Print the picture so you know where they are. If they biscuits are not golden, let them cook longer on the second side and then flip and shoot. Finish cooking the biscuits, make some sausage gravy, and chow down.
3) Repeat the tests with a water pan as describe in my article on the best setup for a gas grill. A water pan above the burners is a great way to stabilize heat and add humidity to the oven. Humidity alters heat transfer, dehydration of the food, and mixes with combustion gases and improves the flavor. If you have a gas grill with only one burner, you need to master this setup. But you should really consider upgrading to a multiburner grill. It gives you much more versatility.
Dry runs for charcoal grills
2) Open all vents all the way. Most of the time you will want to leave the top vents open all the way when you are cooking to prevent too much smoke and creosote buildup inside the oven. You will control the heat by controlling the oxygen reaching the coals, and that means controlling the bottom or intake vents only.
3) Set up for 2-Zone or Indirect cooking. That means you will dump all the coals on one half the grill and none on the other half. The side with coals is the direct heat side, the side without the coals is the indirect heat side.
4) Put the thermometer probe in the middle of the cooking grate on the indirect side. Count the rows of grates from the edge where you placed the probe so you can put it in the exact same location on repeat tests. Write it down. Put the lid on with the vents over the indirect side. Remember, opening the lid lets heat out and oxygen in. Wait for the temp to stabilize by watching the thermometer, probably at least 5 minutes. Take a reading and write it down.
5) Move the probe to the center of the direct side, put the lid on, and take a reading when the temp stabilizes. Make sure you are using a thermometer that can withstand high heat. It can get 600°F or more on the hot side. Write down the reading.
6) Close the bottom vents to 1/2 open and leave the exhaust vents open all the way. Wait for the temp to drop and take a reading. This could take 15 minutes or more. Make a not of how long it takes to stabilize. Move the probe to the indirect side. Wait and read. Close the intake vent to 1/4 open and repeat. Close the intake all the way and repeat. Open it full and repeat. Watch the temp drop as the coals burn down.
7) If you can't get down to 225°F, do another dry run with only half a chimney.
8) If you have a charcoal grill, read my article on the Best Setup for Charcoal Grills. Continue your calibration with a water pan. A water pan is a great way to stabilize heat and add humidity to the oven. Humidity alters heat transfer, dehydration of the food, and mixes with combustion gases to improve the flavor.
9) Study and remember what you have learned.
Dry runs for smokers and other grills
All text and photos are Copyright (c) 2011 By Meathead, and all rights are reserved
For more of Meathead's writing, photos, recipes, and barbecue info please visit his website AmazingRibs.com and subscribe to his email newsletter, Smoke Signals.