Part of the charm of chalk art is that it doesn't require much in terms of tools. You will need a chalkboard, of course. The other necessary items are lightweight, easily transportable, and inexpensive. What's not to love?

Good Old-Fashioned Chalk
A standard piece of white chalk will work just fine. I wouldn't recommend using sidewalk chalk as the thickness will be difficult to maneuver. My personal preference is Crayola Anti-Dust Chalk. Don't let the name fool you! It certainly creates dust, but I've found this chalk to be heavier and denser, which provides a lovely vibrancy when used on your chalkboard.
While we're on the topic of dust, let me just say, it is a great thing! Most of my days are spent covered in it. As you draw, dust specks will inevitably accumulate on your work. I am constantly lightly blowing on the board to remove these specks. Because of this, you may want to be conscious of where you are working.
A Pencil Sharpener or Eyeliner Sharpener
This tool is one of my biggest trade secrets! People are often shocked when they find out that you can sharpen chalk. It's something so simple, yet it will make all the difference for your drawings. Any pencil sharpener or eyeliner sharpener will work, as long as it has two holes. This is a critical element. The smaller hole will work for sharpening your pencil when you are sketching ideas in your sketchbook. The larger hole will fit your chalk perfectly (sizes are pretty much standard -- about a half-inch wide).
A Felt Eraser and a Cloth Rag
A felt eraser will erase the lettering, but it will not completely take away the dust. Instead, it will disperse a dusty cloud around your board. In contrast, a cloth rag, which at different times can be used damp or dry, will remove any unwanted dust entirely. A specific type of rag is not necessary.
A piece of an old T-shirt or a washcloth will do.
Cotton Swabs
Instead of erasing the entire design and starting again, sometimes all you need to do is correct a portion. A cotton swab will give you precise, ninja-like erasing abilities.
A Ruler or Straightedge
The front practice panel of this book conveniently already contains drawn guidelines. However, a ruler will come in handy, especially as you are learning different layout techniques. In addition to a 12-inch ruler, I like using a 6-inch plastic one that easily fits in my bag. Bonus: It can double-duty as a bookmark! At times, it may also be helpful to have a small tape measure handy.
Preparing Your Chalkboards
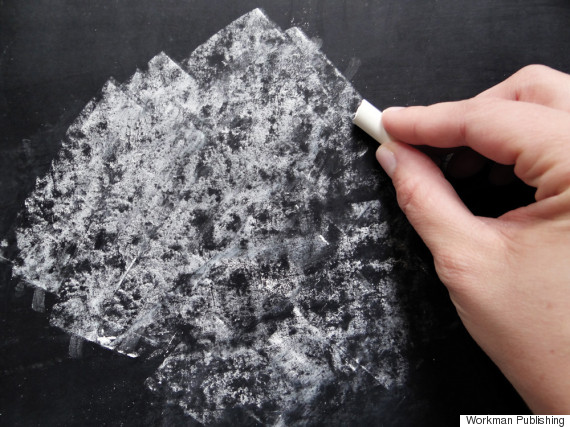
Before you begin drawing, it is necessary to "season" your chalkboard. Chalkboard seasoning sounds fancy, but it simply involves rubbing the side of a piece of chalk over the entire chalkboard and then erasing. A chalkboard that has been seasoned will appear a bit scratched, muted, and gray in color, as opposed to flat, stark, and black.
When you are seasoning a brand-new chalkboard, you may need to wear off some of the protective coating on the chalk beforehand. Just rub the chalk on any hard surface. It might take a bit of rubbing to get the chalk to transfer to your board at first, but once it does, keep going until it's completely covered. Wipe the board clean with your cloth rag.
The purpose of seasoning a chalkboard isn't just to create a rustic look, but to prepare the surface for handling chalk. An unseasoned chalkboard runs the risk of the chalk "burning" into the surface, leaving a permanent mark. The chalk on a seasoned chalkboard will remove cleanly over and over again.

Getting to the Point
On your chalkboard, draw a line with a blunt piece of unsharpened chalk. Now, sharpen another piece of chalk and draw a second line with the pointy edge. Notice the difference in the texture of the lines' edges. The blunt chalk will provide a rough, broken edge. The sharp chalk will deliver a tight, more exact line. As you continue to use the sharpened chalk, observe how it wears down to a dull point. Continue drawing lines, but vary your pressure. When you apply heavy pressure, the result is a bright white line as opposed to a lighter, more textured line when soft pressure is applied.
The above is an excerpt from McKeehan's The Complete Book of Chalk Lettering, released by Workman Publishing.
Also on HuffPost:
