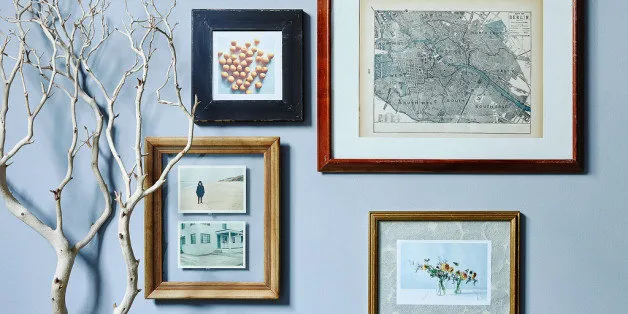
None of the frames pictured below cost more than $10, and all of the art was framed by (a non-professional) hand. Intrigued? Read on to find out how to use thrift-store supplies and a few DIY smarts to frame like a pro.
Knowing a reliable custom framer in your town is essential if you love to hang art; who better to trust with your favorite new pictures, prints, paintings, and posters than an artist? But that sinking feeling when you see the price tag at pickup is almost inevitable, especially when framing less valuable pieces like printed instagrams and pictures of your friends. If it leaves you wondering if there's a less expensive way, the good news is that there is, and -- hooray! -- it's by upcycling frames that would otherwise go to waste.
The first step in framing freedom is to start looking for quality vintage frames -- a task that's not as taxing as it sounds -- regularly. When you're at the local thrift store or flea market, look for bad art in decent frames or even decent frames that are empty, and spend no more than $5 on anything (up to $10 for the big frames). It's a bit of a mental shift from looking for quality art in thrift stores, which can be a needle in a haystack, but the vintage frame hunt is consistently more rewarding. Once you start adjusting your perspective to see them, good old frames spring up everywhere. Check for two things: that the frame is sturdy, meaning when you wiggle it the corners hold rigidly at right angles, and that it comes with a piece of glass, which will save you the cost of having a custom piece cut to fit.
Prep an old frame for re-use by first un-framing the existing art:
- Flip it over to see if there's a "dust cover," which is brown craft paper that's trimmed to the size of the frame and glued to the back, sealing everything inside. If so, use a box cutter or x-acto knife to slice around the edges, remove, and discard it.
- Now, using pliers or a screwdriver, carefully bend back the staples or metal flaps called "points" that secure the art and any cardboard or thick backing in the frame, then remove the existing art and glass with care.
- Clean the glass on both sides with glass cleaner and put it back in the frame (cloth gloves make this fingerprint-proof, but careful hands work, too).
- Before tossing it, take a look at the "bad art" you just removed and decide if it can be salvaged. Sometimes beauty is just a matter of framing -- and a big white matboard, that piece of thick paper that often separates the art and the frame, can do wonders.
Once your frame and glass are free to house new tenants, use them to frame new pictures (or the art you just salvaged) one of these three ways:
1. Use alternative forms of matboard:
Printing your favorite pictures at home, on regular paper or photo-quality, is easy and cheap.
Crisp white matboard might be the most traditional way to give your art that gallery-quality look, but don't be limited by it. Scrapbooking papers (a wide selection can be found at any craft store), recycled, vintage papers (see above!), or even swatches of thick fabric can all be used to mat art and photography. Note that if you're working with fine art or pictures printed on photo paper, all matting supplies should be acid-free.
Just cut your desired matting to the size of the frame and tack the picture on top of it using double-sided tape or framer's tape, which is archival quality. If you'd like a white background to separate the two, a piece of plain paper can be cut a smidge bigger than the art and placed between it and the mat.
Tip: If your frame doesn't have glass, buy a custom piece (of glass or plexiglass) from a framing store. It's not that expensive or time-consuming to have a piece of glass custom cut for a frame; just be sure to bring the frame with you so they can measure the exact size. The prices below came from a boutique framery in NYC where they'll cut your glass while you wait, so consider them the high end of what you can expect to pay. A larger craft store with a framing department should be able to do the same for even cheaper. Choose plexiglass, which is lightweight, scratch-resistant, and pretty impossible to break, if you don't mind that it's a little more expensive (see below) and not all-natural.
- 8" x 10": $3 for glass/$4 for plexiglass
- 11" x 14": $6 for glass/$8 for plexiglass
- 18" x 24": $10 for glass/$24 for plexiglass
- 24" x 36" (poster-size!): $22 for glass/$44 for plexiglass
2. Float your pictures:
In need of easy art? Quirky, vintage photographs can be found at many thrift stores for pennies.
Floating a few pictures between glass is simple and professional-looking, and it's an especially good tactic when you've got a few photographs that go together and a larger frame, or for when you don't want to bother with a matboard. Even if your frame already has a piece of glass, you'll need a second piece of the same size for this DIY -- just have one cut or borrow from another cheap frame of the same size.
Clean the two pieces of glass and add one to the frame. Tack your pictures face-up to the second piece of glass using small pieces of acid-free, double-sided tape in the corners, then put that glass in the frame so the pictures are protected on both sides. Bend the points to secure, and then hang!
Tip: Sand or paint your frame to give it new life. If you find a sturdy wooden frame in a design you love but it has a cheap-looking finish, sand it! Hardware stores sell sandpaper, though for better control you might look for a "sanding sponge," which is sandpaper affixed to a foam block. Start by lightly buffing the front and sides of the frame to see if you like the shabby-chic, rustic look that emerges, or sand all the finish off to reveal a raw wood grain (as in the frame pictured above). Sometimes, unfinished wood is pretty just as it is, but if the color is off or you don't like the matte look, paint over it. Sanding a wooden frame will ensure that the paint is smooth and professional looking, though, of course, you can paint over metal frames without sanding them at all.
3. DIY a true matboard:
Old maps, like this one of Berlin, are often beautiful and make great gifts when nicely matted and framed.
If you collect vintage frames frequently enough, you'll often have roughly the right size on hand when you acquire art (and when not displaying your art, you can use them as decor!). The trickier part will be getting a fresh, clean matboard to make a piece fit just right. You can have a matboard cut at a framing or craft store for a reasonable price (from under $10 for an 8" x 10" to around $30 for a 24" x 36"), but if you're going to be matting a bunch of things and have a clean, sturdy table to work on, consider investing in some supplies to cut them yourself -- it will quickly pay off!
Armed with a hand-held mat cutter, which is an angled blade on a hand-held pusher, a sharp x-acto knife, a t-square ruler like the one above, and a cutting mat, you're well on your way. A giant sheet of matboard can be as cheap as $10. Just follow these, ahem, professionally-illustrated steps:
After your art is affixed to your matboard, put it in the frame behind the glass. Back your art with a trimmed piece of acid-free foam core (you can cut a large piece down using your cutting mat, t-square, and x-acto) to protect it, and then bend the points back in place to secure. If the aforementioned steps make you nervous, just buy the custom-trimmed matboard when you get your glass, both of which can also be ordered from online framing companies, which, by the way, are a cost-effective way to get new custom frames that you put together yourself.
However you acquire the pieces, framing your own art is not going to cost nearly as much as having someone do it for you. Of course, framing some art is best left to the professionals: Paintings on thick canvases, fabrics or articles of clothing you want suspended on matting, and anything ultra-expensive is best left to the experts.
What are your tips for inexpensive framing? Tell us in the comments!
Photos by Rocky Luten
Also on HuffPost:
