The Core is a word that is loosely used all the time in the fitness community. If you go to the gym, you will rarely hear the word abdominal bracing being used. However, in order to successfully incorporate your core muscles into an exercise, you must first know how to brace your abdominal muscles which in turn fires up your core muscles.
According to doctor of physical therapy of Joint Effort Medical Wellness, Michael Shapow, DPT, Ph.D., "Without abdominal bracing, the lower back is placed in a vulnerable position, opening it up to potential strain or injury. Every active person should comprehensively understand abdominal bracing before participating in vigorous activity. It is important to also note that as we age, we get declining support and ligament laxity in our para-spinal musculature. Therefore core strengthening and flexibility in the muscles surrounding the core are paramount to injury prevention."
The following program includes several exercises that truly teach you how to get down into the core. Master the feeling of the contractability of your core muscles so that you can learn how to incorporate these bracing techniques when executing any and all exercise programs and sports participation.
Abdominal Bracing: 
Starting with static abdominal bracing, it is best to use the floor to gauge whether or not you are bracing. The easiest way to describe a true brace is as if you are flattening the space between your lower back and the floor. If you place a piece of paper under your lower back, no one should be able to take the paper from under you because your lower back is pressed flush against it firmly into the floor. This creates a slight posterior pelvic tilt which neutralizes the position of the hips. Hold each brace for 5 full counts then release. Repeat 10 times. To watch the video demonstration, click HERE.
Dead Bug: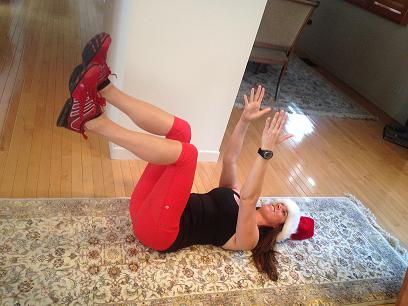
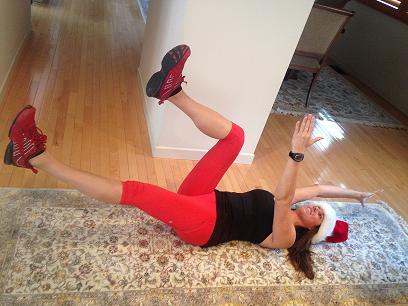
Keeping the idea of abdominal bracing, simply lift your legs up to table top position with your arms up in alignment with your chest. Brace your core. Then, extend your right leg forward and your left arm overhead. Maintain a neutral spine without losing the bracing. The tendency is to arch the lower back so keep a focus on your midsection and then return your limbs back to starting position. Switch sides; the left leg with the right arm overhead. Repeat opposite arm with the opposite leg.To watch the video demonstration, click HERE.
Forearm Plank: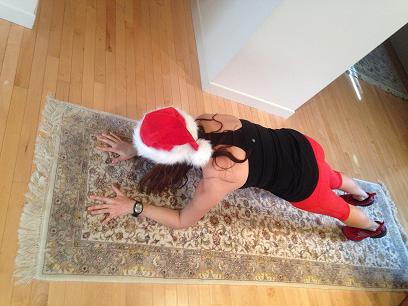
Now, you should flip over so that your spine is suspended in space, and you no longer have the proprioceptive tool of the floor (proprioecption is your brain's ability to know where it is spatially). Brace your whole core as you did when you were supine (on the floor). With a timer, hold the plank for 30 seconds.To watch the full plank variation video demonstration, click HERE.
Forearm Plank with Arm Variation: 
After you perform your forearm plank, you have the option of resting for 10 seconds, or going right into an arm variation for added balance. First widen your feet to be wider than hip distance apart. While keeping your hips squared to the ground, bring your right arm behind your back and hold the plank for 15 seconds. Switch sides. You have the option to rest for 10 seconds after a total of 30 seconds between both sides.To watch the the full plank variation video demonstration, click HERE.
Forearm Plank with Leg Variation: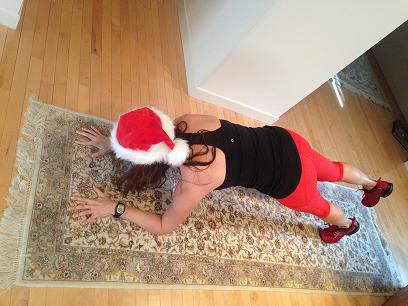
After you perform your arm variation plank, you have the option of resting for 10 seconds, or going right into the leg variation Bring your feet together. Without arching your lower back, lift one foot a few inches off the ground. Keep your core braced and your breath present in the pose. Hold your foot up for 15 seconds and then switch sides. After you perform each side, you can rest for 10 seconds.To watch the the full plank variation video demonstration, click HERE.
Forearm Plank with Arm and Leg Variation: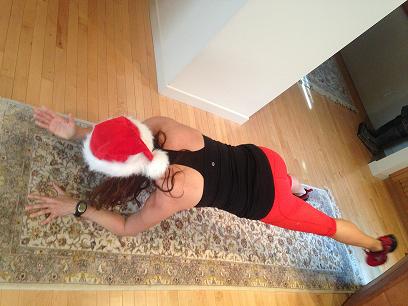
After you perform your leg variation plank, you have the option of resting for 10 seconds, or going right into the opposite arm and leg variation. Bring your feet together. Bring your right arm up and your left leg up a few inches off the ground. Stabilize this contralateral movement (opposite sides across the body). It will create a lot of instability, but if you focus on bracing your core, you will be able to stabilize through the hips and lower back. Make sure you breathe. Hold up each side for 15 minutes and then rest for 10 seconds. To watch the the full plank variation video demonstration, click HERE.
Video and Photo Credit: Mr Smith