
Once you've tasted freshly made ricotta, you can't help but be hooked!
The first time I did was in Tuscany. The cheese was so fresh, it was still warm! I'll never forget the experience. How could something so simple be so delicious?
Ever since that first bite, I've been seeking out freshly made ricotta in gourmet stores or farmers' markets. It finally occurred to me that I'd be better off simply making my own. I could make the precious cheese whenever I needed it, and would never again have to go out of my way to find it.
The revelation for me was that making ricotta at home is almost as easy as boiling an egg! Today, making my own ricotta is as routine as brewing my morning tea.
Ricotta in Italian means "re-cooked." It's made by re-heating the whey left over from making another cheese. In Tuscany, the leftover whey they use is from sheep's milk pecorino. (Yes, that was my unforgettable first bite!)
So, while homemade ricotta is not a true ricotta, it certainly tastes just as good! Here milk instead of whey is heated up to near boiling point, then acid is added to precipitate the formation of curds. Once formed, the curds are drained through a cheesecloth... and voilà! Within a few minutes you've made your very own batch of fresh ricotta.
Here's the recipe I developed for this most simple of cheeses. I've tried it with different acids and with different milks. All yield a different-tasting but always stunning ricotta.
Recipes:
- Pan-fried zucchini flowers with ricotta and garden herbs
- Crostini with ricotta, truffle honey and smoked salts
- Farro with sweet peas, fresh herbs and ricotta
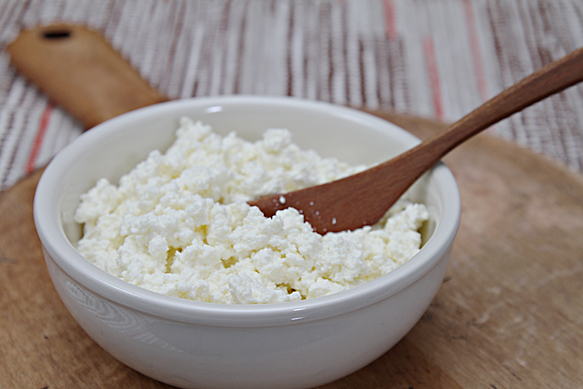
Homemade Ricotta Cheese
Makes 1 cup
Active time: 10 min
4 cups whole milk
1/2 teaspoon sea salt
3 tablespoons distilled vinegar, fresh lemon or lime juice
Fine cheesecloth
Step 1: Place the milk in a heavy-bottomed pot. Add the salt and heat over medium heat. Stir occasionally so the milk doesn't scorch. Heat milk to 180ºF to 190ºF (82ºC to 88ºC). If you don't have a thermometer, heat the milk until it foams at the sides of the pan and starts simmering, but doesn't boil.
Step 2: Remove pan from heat and add vinegar, lemon or lime juice. Stir only a couple of times. Almost immediately, curds will start to form. Make sure not to stir any more so as not to disturb the curds. Let stand for five minutes.
Step 3: Line a medium sieve with the cheesecloth and carefully pour the milk mixture into the cheesecloth, disturbing the curds as little as possible. Let drain for five to 20 minutes to the desired consistency. Draining for five minutes will give you a moist and creamy cheese. Draining for 20 minutes will give you a drier ricotta. You can drain the ricotta for longer of course, just remember that the longer it drains, the drier it'll be. Scroll down for the step-by-step instructions and photographs.Transfer the ricotta to a container and cool to room temperature. Cover and refrigerate for up to seven days.
The milk
Different kinds of milk will give you different ricottas. Cow's milk is, of course, the milk that's most readily available. You can use either ultra-pasteurized or pasteurized milk. I find the difference to be minimal, but the pasteurized milk does yield a slightly more moist ricotta. Goat's milk, which you can find in health or gourmet stores, makes a creamy and tangy ricotta that's perfect for spreading on a slice of crusty bread or for desserts. I'm still trying to locate sheep's milk, which to me makes the most sublime ricotta of all.
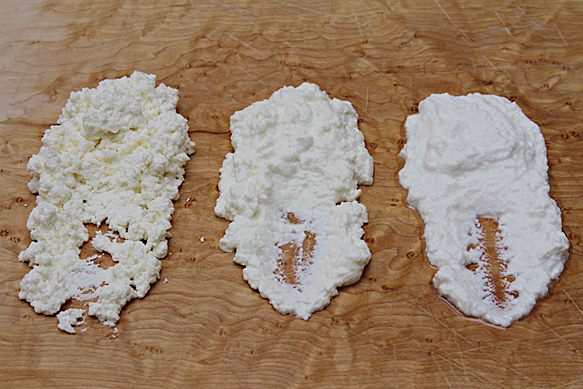
• Ultra-pasteurized cow's milk (left): The curds are large and form very quickly. This ricotta drains very fast. I find that five minutes is sufficient for a crumbly yet moist texture.
• Pasteurized cow's milk (center): The curds are also large and form quickly, but the ricotta has a creamier texture. For a crumbly and moist texture, drain it for five to 10 minutes.
• Pasteurized goat's milk (right): The curds are small. This ricotta will need at least 20 minutes of draining or more. It has a soft, creamy texture.
Note: You might find recipes for homemade ricotta that call for adding heavy cream to the milk, but I am a purist and prefer the curds on the lighter and drier side.
The acid
Flavor-wise, distilled vinegar makes for the purest ricotta. The vinegar imparts no flavor to the cheese and is very reliable, yielding the same results in every batch.
Lemon and lime juice are also good acids to use for making cheese. They will both give the cheese either a slightly lemon-y or lime-y flavor, which works wonderfully in certain recipes. Since the pH level varies in each fruit, however, you might need to add a little extra lemon or lime juice (about one tablespoon) to the warmed milk if your curds are not forming right away.
My advice is to start making ricotta with distilled vinegar until you're comfortable with the process. Then you can experiment with fresh lemon or lime juice.
Draining the ricotta
This step is crucial. The more you drain your ricotta, the drier it'll be. The best method is to flake a little bit of ricotta with a fork while it's draining to see how the texture is turning out.
A cheesecloth is a very handy accessory to have. These days you can find it in most grocery or cooking supply stores. But in a pinch you can use a strong paper towel (the kind that doesn't fall apart when soaking wet!). I've had to resort to this a few times, when I've forgotten to replenish my supply of cheesecloth, so I can vouch for its working out well enough.