What's HDR ?
Since the invention of photography, rendering shadow and highlight detail has been a challenge to photographers. Luckily, today, it's gotten significantly better and easier; we have new more sensitive tools, with more options both during and after exposure, and plenty of room for creativity. The state-of-the-art technique today blends bracketed exposures (at a minimum one dark for highlight detail and one light for shadow detail) into a single file with optimal detail throughout an image's dynamic range.
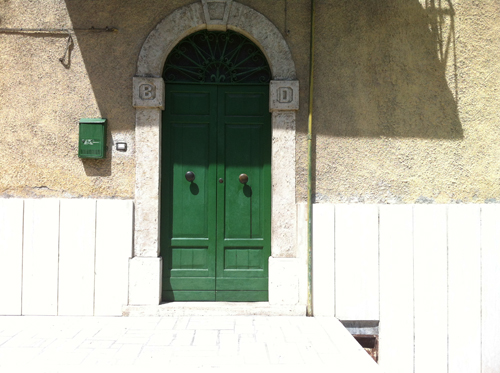
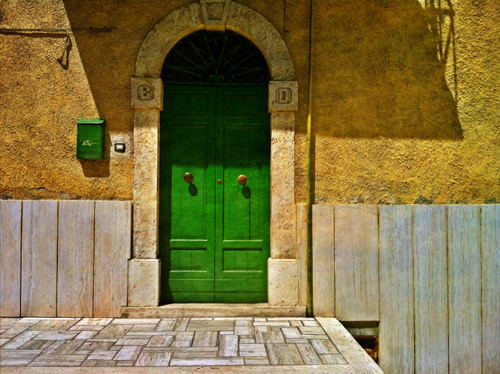
Bright exposure -- best shadows

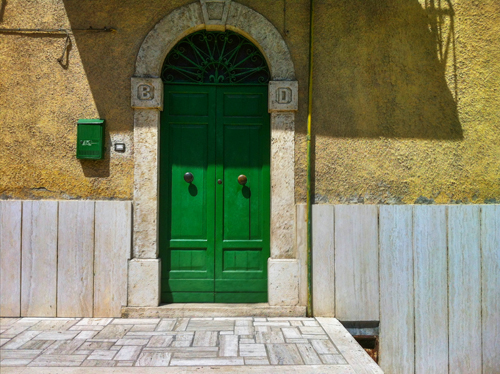
Dark exposure -- best highlights
Three exposures blended -- best detail overall
3 Paths -- Simple and Basic to Complex and Powerful
If you're looking for better detail in the shadows and highlights of your mobile photographs you've got choices. Moving from simple and limited to more complex and robust, consider these three: first, the iPhone Camera app's built in HDR function; second, the app Pro HDR; and third the app TrueHDR. I use all three, moving from one to another as the contrast of the scene increases.
iPhone Camera App
Tap the Options icon and slide the HDR function on and the iPhone will take multiple shots for each image, delivering one standard photograph and one processed HDR version with improved shadow and highlight detail. The iPhone's HDR function is virtually free of the classic artifacts produced by many HDR softwares, particularly when used aggressively; halos, localized vignetting, saturation distortions, increased texture and noise. Even if you wanted them, you couldn't produce them with this function, as there are no controls for the effect. (Use other apps to do this.)
Why wouldn't you take every image with the built in HDR function on?
You'd make twice as many exposures but you'd have far fewer images that lack detail, detail that is almost always visually pleasing and sometimes critical to the success of an image.
When you need an app capable of rendering detail in scenes with more contrast than the built-in HDR function can handle try the apps True HDR and/or HDR Pro.
Pro HDR
The camera app Pro HDR offers two exposure modes; Auto and Manual. If you choose Auto, the app will analyze a scene and take a dark exposure (with great highlight detail but poor shadow detail) and a light exposure (with great shadow detail but poor highlight detail) and blend the two together, producing a processed version. Turn the setting Automatic sliders on before you make exposures and an interface will appear that will allow you to control the results before saving with five sliders - Brightness, Contrast, Saturation, Warmth, and Tint.
If you choose Manual, you'll be able to position two blue boxes to set the light and dark exposures. Automatic does well for most situations; Manual is necessary for only the most contrasty scenes. Make sure to turn the app's Save original exposures on, in case you want to process the separate shots again with the Action HDR from Library or with another software. You can use HDR from Library to process images made with another camera app. (Check the setting HDR Resolution to ensure that you get Full resolution files.)
TrueHDR
For scenes with extreme contrast try the app TrueHDR. TrueHDR offers three exposure modes; Auto Capture, SemiAuto Capture, and Manual Capture. Auto Capture takes three shots successively, aligns, and merges them before offering you four sliders to further enhance the effect - Warmth, Contrast, Saturation, and Brightness. (Unfortunately, TrueHDR will only display and save two original exposures, making it no better nor worse than other HDR apps; if it saved three this would be my go to app for HDR exposure.) SemiAuto Capture allows you to position two blue boxes to choose image areas to set light and dark exposures. Manual Capture does the same thing, but requires you to tap the screen after specifying each point that can lead to unwanted camera motion, which is why I avoid using it. TrueHDR offers two preferences that affect the final results significantly; Natural (producing fewer HDR artifacts) and Enhanced (which can punch up the results, sometimes dramatically). The preference "Automatically save original pictures" will allow you to reprocess exposures, so you can compare the results generated by different settings, now or in the future. While TrueHDR is capable of handling scenes that have the highest contrast, you'll get more detail from it than any other app, it also tends to produce the strongest artifacts, like haloing.
Apps Compared
It's virtually impossible to produce identical results with all three apps; each offers its own flavor. When possible, try all three and compare the results. Over time, you'll develop a better sense of which app you'd like to choose for a given scene and the way you'd like to render it.
Both Pro HDR and TrueHDR offer a variety of post-processing effects, such as black-and-white or sepia. Use them if you want quick convenient results; other apps that specialize in these functions offer even better results.
It's rare, but eventually you'll encounter a scene containing so much contrast that even these three apps won't be able to render all the detail in them, but you'll get significantly better results.
HDR Tips
All HDR applications that rely on merging multiple exposures, motion (either moving subjects or camera motion) can produce curious blending artifacts that are generally undesirable. Avoid motion, unless you plan to use these artifacts to produce a creative effect.
As a final note, if you haven't made HDR exposures but want improved shadow and highlight detail in standard single exposures, consider apps that simulate flash, such as the app Flash.
The strength of HDR renderings and the artifacts they tend to produce can be varied to suit individual tastes. Regardless of whether you favor a light touch or a heavy hand, if you photograph, with or without a smart phone, sooner or later you'll need HDR. It's an essential technique.
John Paul Caponigro is an environmental artist and author, who leads workshops, seminars, and lectures internationally. Learn more at www.johnpaulcaponigro.com.