 Photo by Kristine Larsen
Stylelist Home is proud to present a project-a-day from the fabulous new book This Old House Salvage Style Projects.
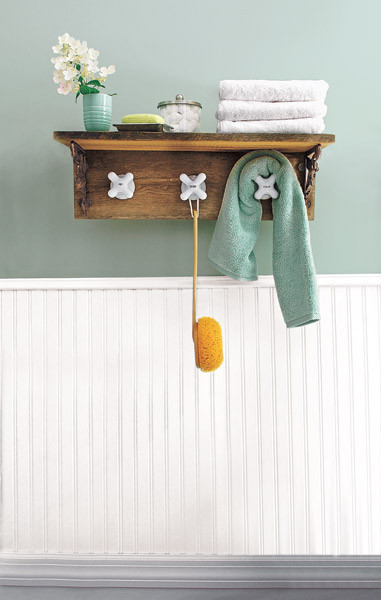
The truth is that faucets rarely come to mind as material for reuse and repurposing. But this DIY towel rack and wall shelf shows otherwise. Made from grainy barn wood, ornate cast-iron brackets, and discarded porcelain cross-handle faucets, this low-cost alternative certainly beats those run-of-the-mill towel racks and wall hooks, and it also gives your bathroom a touch of vintage charm.
TITLE: Use Faucet Handles To Make A Towel Rack
TIME: 1 HourCOST: $100SKILL LEVEL: Easy
SUPPLIES:3 Porcelain handles and escutcheons Barn wood or scrap boards2 Shelf brackets3 Dummy spindlesPencilEpoxy1 5/8-Inch trim-head screws
TOOLS:Tape measureDrill/driver1/16-Inch drill bitScrewdriverCombination square
Step 1: Measure the mounting board. Cut wood to size and use a tape measure to determine the rough distance between each handle. I planned to space mine evenly across the face of the board. Factor in an extra inch on either side of the board for the brackets.
Step 2: Mark where the shelf will go.Trace a line on the board where its top shelf will sit to figure out how high to position the supporting brackets on either end.
Step 3: Determine the bracket locations. Position the brackets 1 inch in from the ends of the mounting board, with their tops just below the pencil line. Mark where the brackets' fasteners will go.
Step 4: Secure the brackets.First, use your drill/driver to create pilot holes for the fasteners. Then use the screws provided with the brackets to fasten the supports to the board.
Step 5: Mark layout lines to determine handle placement. Use your pencil to lightly draw a horizontal line across the center of the mounting board. Then mark evenly spaced vertical lines through the horizontal one. The handles will go where the lines intersect.
Step 6: Add the dummy spindles. Place the posts on the marks and drill pilot holes for their fasteners. Secure the posts to the board.
Step 7: Glue on the escutcheons. Mix a two-part fast-drying epoxy formulated for bonding metal. Spread the epoxy on the rims of the porcelain escutcheons and place them over the spindles.
Step 8: Adhere the handle "hooks."Fill the metal fittings at the base of each handle with epoxy and fit them on top of the spindles. Wipe away any epoxy that seeps out, and wait 5 minutes for the adhesive to set. (It takes 1 hour for it to cure.)
Step 9: Put on the shelf.Rest the shelf top on the brackets. To secure it in place, drill pilot holes and drive trim-head screws through the back of the mounting board and into the edge of the shelf. Now pick a nice spot in the bath for your new towel rack.