
Mesopotamia January-February 1916: The Relief of Kut Al Amara

British prisoners of war from the surrender at Kut Al Amara
At the beginning of January 1916, General Sir John Nixon dispatched a relief force under Lieutenant-General Sir Fenton Aylmer to relieve the British force under General Charles Townshend besieged at Kut Al Amara. The British force made several attempts, between January and March 1916, to lift the siege of Kut; all of which were unsuccessful. Two battles in particular, the Battle of Sheikh Sa'ad and the Battle of the Wadi, while technically British victories, resulted in significant British losses and failed to reach the beleaguered garrison in Kut.
The Battle of Sheikh Sa'ad was fought from January 6-8, 1916, along the banks of the Tigris River. Aylmer dispatched the 19th, 28th and 35th Indian Brigades of the Anglo-Indian Tigris Corp under the command of Sir George John Younghusband, a cavalry officer and major general in the British Indian Army. The rest of the British force, under Aylmer, stayed behind in Ali Gharbi awaiting further reinforcements that were in route.
Younghusband had been ordered not to engage the Ottoman 6th Army until the rest of the British force arrived. The combined British contingent numbered over 13,000 men, including 9,900 infantry and 1,340 cavalry. The Ottoman Sixth Army numbered 9,000 infantry and included one cavalry brigade. The British had 42 artillery pieces versus 20 for the Ottoman force.
The battle terrain was flat and featureless. The Ottoman positions were well constructed and camouflaged. The Tigris Corp lacked any aerial reconnaissance and had little idea of what lay ahead of them.
Beginning on the morning of January 6, Younghusband's troops began to run into the Ottoman force. Instead of waiting for Aylmer's arrival or concentrating his forces, Younghusband ordered his troops on both sides of the Tigris to press the attack. Although outnumbered by 4 to 1, the Ottoman 35th Division stubbornly held its ground.
On January 7, with the arrival of Aylmer's force, the British again pressed the attack. Advancing on both sides of the Tigris the British force came under long-range fire from the Ottoman defenders. Lacking any natural cover the Tigris Corp were forced to dig in and were unable to penetrate the Ottoman lines.
By January 8, however, the 26th Brigade, reinforced by the 62nd Punjabis and 92nd Punjabis under Major-General Sir George Kemball, had penetrated Ottoman lines on the right bank of the Tigris. With their flank exposed to British fire, the Ottoman force on the left bank of the Tigris was also forced to withdraw, assuming previously prepared positions some seven miles to the rear.
Technically, the Battle of Sheikh Sa'ad was a British victory. Militarily it failed to achieve its primary objectives. The Ottoman force was not destroyed nor was the siege of Kut any closer to being lifted. The modest British advance had come at a frightful cost. Of the 13,300 men in Aylmer's force, 1,962 had been killed and 2,300 had been wounded. Roughly 1 of every 3 men in the Tigris Corp was a casualty.
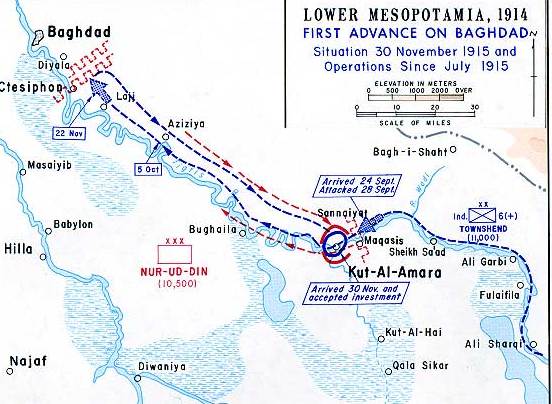
Mesopotamian theater showing the initial British advance on Baghdad and the retreat to Kut Al Amara
Less than a week later, on January 13, Aylmer launched a second attack against Ottoman defensive lines along the banks of the Wadi River. The valley of the Wadi was on the direct route to Kut and was heavily defended by about 20,000, well entrenched Ottoman troops.
The British objective was to outflank the Ottoman force along the Wadi, capture the Hanna Defile and then surround and destroy the Ottoman troops.. Kemball engaged the Ottoman frontline, attempting to pin it in place while Younghusband, commanding the bulk of the British force, attempted to wheel around the Ottoman force in a broad flanking movement.
The British force was outnumbered by better than 2 to 1. Poor roads, a lack of reconnaissance, and a persistent fog delayed the British advance. Younghusband's force quickly became lost. The Ottoman force wheeled to face the British flanking movement and was able to repulse the attack inflicting heavy casualties.
By the end of the day, Aylmer called off the attack and regrouped his troops on the right bank of the Tigris. The battle had cost Tigris Corp another 1,600 casualties. Medical facilities were proving to be completely inadequate with many of the wounded subsequently dying from a lack of medical care. The two battles had cost Aylmer almost half his force and the British were no closer to the relief of Kut than they had been at the start of the campaign.
Aylmer continued to attempt the relief of Kut and to break through the Ottoman lines surrounding the city over the next several months. On April 29, abandoning any hope of resupply or rescue, Townshend surrendered his position. A total of 13,164 British and Empire soldiers surrendered and were imprisoned by the Ottomans. The loss came barely four months after the Allied defeat at Gallipoli. It had been many years since such a large force of British soldiers had surrendered to an enemy.
Virtually all of the British commanders who had failed in the attempt to relieve the Siege of Kut were removed from command. The Ottoman military may have been considered a second rate force compared to its European counterparts, but it had demonstrated at Gallipoli and now at Kut, that it could hold defensive positions against a superior force.
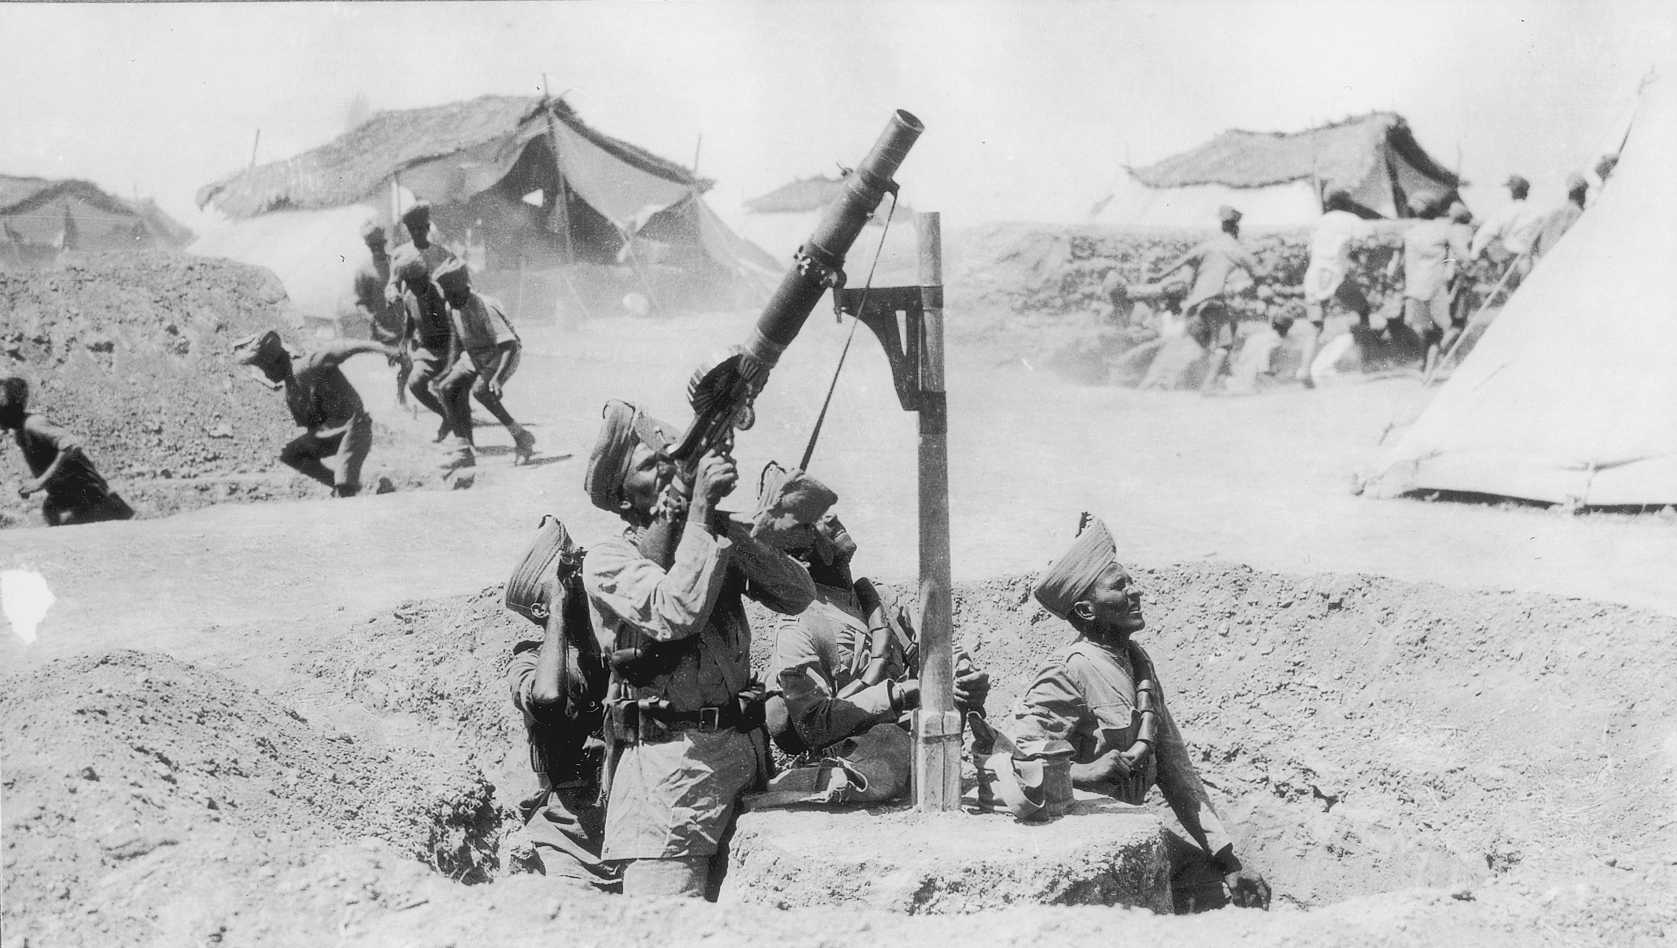
Indian gunner at the siege of Kut Al Amara
What had begun as little more than a publicity stunt, a move designed to increase British prestige in the Arab world, now, following the defeat at Kut, took on an importance all of its own. Concerned that a "lack of action" would encourage Muslim unrest in India, Persia and Afghanistan, the War Committee of the British government urged a second attempt to take Baghdad.
The defeat at Kut had also underscored the problem of resupply in the Mesopotamian Theater. Port facilities in Basra were inadequate for modern cargo ships. Ships arriving in Basra had to be unloaded into smaller boats that then proceeded into the harbor to unload. There was a shortage of warehouses in which to hold supplies and ships often had to wait for a week or more before they could be unloaded.
With plans for a new offensive now looming, the port of Basra was enlarged and modernized, a railroad was built north from Basra and the road network around Basra was improved. Additional and better river steamers were introduced to bring supplies up river. The new British commander, General Fredrick Stanley Maude, was given the command of the newly reinforced Tigris Corps. It consisted primarily of the Third Indian Army and numbered some 50,000 men, organized into two corps.
Beginning in 1917, the Tigris Corp renewed its drive into Mesopotamia. In short order it recaptured Kut Al Amara and on March 11, 1917 took control of Baghdad. The British drive would continue, even after the armistice of Mudros on October 31, 1918 only stopping with the seizure of Mosul on November 14, 1918. The British government would subsequently organize the region, including Mosul province which had not historically been part of Ottoman Mesopotamia into the state of Iraq. The consequences of that decision would echo for the next century.