
Despite my creative talents in other areas, I wouldn't exactly call myself a DIY Diva. Sure, I spend hours every weekend watching HGTV with my mom and daughter, but I always felt that I lacked the vision to pluck some hidden treasure from a thrift store, Craigslist, or flea market and turn it into something amazing. Well, recently an opportunity arose that challenged me to do just that.
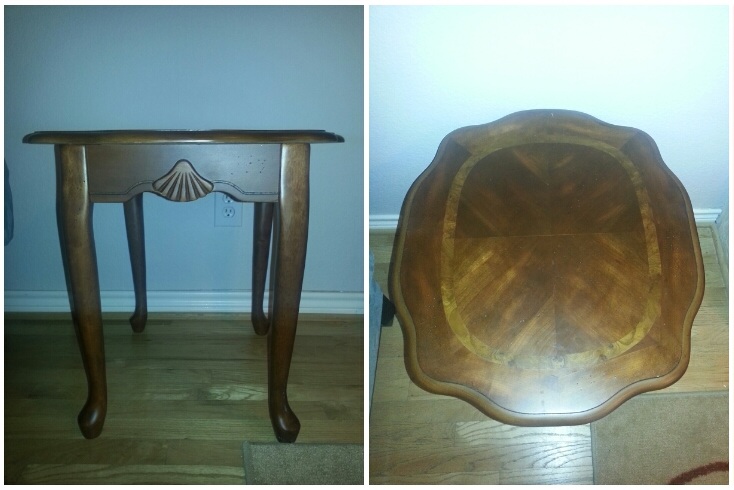
With only $100 to spend, I was tasked with finding a thrift store treasure and rehabbing it into an item that someone would actually bid for at an auction. After a number of fruitless stops, I finally found a nice, wooden side table with curved legs, novel contours on the tabletop and a scallop shell carved into both sides. It cost me $35.
For weeks I debated what I'd do with it to make an impact and then a crafty co-worker introduced me to marble paper. My idea was born.
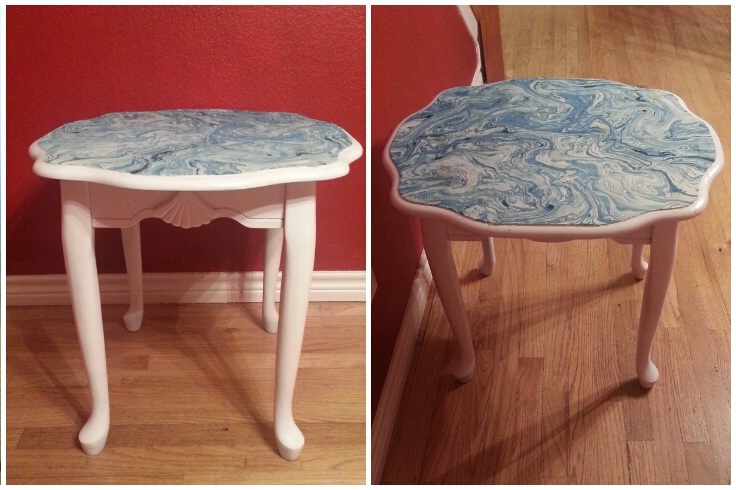
Playing up the shell accent on the table, I opted for a swirling, marine blue and white marble paper. Two sheets (just in case I messed up one) came to $16 and it was another $7.95 for the Mod Podge (something I'd never heard of before, but came highly recommended by the sales associate for my project). I already had a can of satin finish and white spray paint at home, from a project I did with my daughter a little while back. So I took to my garage and went to work.
The drab-to-fab process:
First, I wiped down the table with a soft, dry cloth to remove any excess dirt or dust. I didn't use a paper towel to avoid trace amounts of paper fibers being left behind. I laid a sheet of marble paper over the top of the table to judge which sections would be left exposed. Luckily, the width was just enough to cover it all -- the length was no problem.
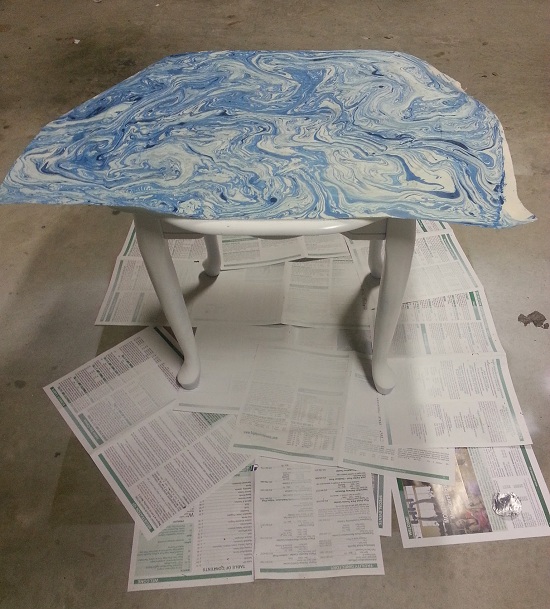
Next, I started spraying the legs of the table. As I moved around to each side of the table, I noticed that I was starting to leave white footprints on the garage floor, and eventually got a clue to lay out paper on the floor. I transferred the table onto the newspaper and continued the painting process. Two coats gave it a nice, crisp finish.
After all of the legs and sides were painted, I carefully sprayed the areas of the table that would not be covered by the paper. I let the table dry for the afternoon and later came back to apply a thin layer of Mod Podge. It's necessary to emphasize that a thin layer is required, because even though Mod Podge dries clear, if you use too much of it, it'll soak through your paper, leaving slight discoloration.
After a few deep-meditation breaths, I carefully laid the marble paper onto the table, gently smoothing any loose areas and air from the surface. I left it to dry overnight.
The following day, after more deep-meditation breaths, I used a craft knife to carefully cut away the overhang from the contours of the table top. This was a nerve-wracking process, and it pays to go slowly.
With a final, deep exhale, the cutting was finished and the table was stunning. It went from looking like something from Grandma's house to a posh, little piece that would be at home in any chic setting.
I sealed the table with two thin layers of Mod Podge that I let dry for a few hours in between coats. For an added layer of protection, I used a thin layer of acrylic spray coating, which I let dry overnight.
You can vote for my side table in the Ultimate Upcycle Challenge for the Great Big Texas Home Show. Voting ends March 7.
****
Quia Querisma is a digital marketer by day, freelance writer by night. Get her latest insights on travel and fashion on her blog, MyJetSetStyle.com.